Launching your WordPress website is exciting — but what if the theme doesn’t quite capture your brand’s identity? You’re not alone. Many website owners find that their chosen theme needs a personal touch to truly stand out. The good news? Customizing your WordPress template isn’t complicated or limited to coders.
With just a few smart tweaks, you can transform your site into a polished, professional reflection of your brand. From adjusting colors and fonts in the WordPress Customizer to designing unique layouts with page builders like Elementor, every change helps you create a more engaging user experience. In this guide, we’ll walk you through everything — from simple edits to advanced customization — so you can confidently turn your theme into a website that feels 100% yours.
Section 1: Foundational Principles: Preparation is Everything
Before you change a single pixel, a successful customization project begins with rock-solid preparation. Skipping these steps is the most common mistake beginners make.
1.1. Choose the Right Theme: A Foundation for Flexibility
Your choice of theme is the single most important customization decision you will make. A poorly coded theme will fight you every step of the way, while a well-built one will make customization a breeze. Look for themes that advertise customization options and are built with SEO optimization in mind.
- Look for “Customization-Friendly” Themes: Choose themes that are renowned for their lightweight code and deep integration with WordPress page builders like Elementor and Beaver Builder. They are designed to be customized.
- Check the Customizer Preview: Before installing, use the theme’s live preview in the WordPress Customizer. This gives you an early feel for its theme customization options.
- Read the Reviews and Support Forums: Active support and frequent updates are non-negotiable for WordPress security and compatibility.
1.2. The Golden Rule: Create a Child Theme
This is the most critical best practice for WordPress customization. A child theme is a sub-theme that inherits all the functionality and styling of its parent theme. Why is this so important?
When you directly modify your parent theme, all your hard work will be erased the moment the theme author releases an update. A child theme protects your modifications.
- How to Create a Child Theme: You can create one manually by creating a new folder in /wp-content/themes/ and adding a style.css file with a specific header, or you can use a plugin like “Child Theme Configurator” to automate the process.
When is it Necessary? Any time you plan to edit theme files (PHP, CSS, JS) directly, you must use a child theme. For CSS customization alone, you can often use the WordPress Customizer’s “Additional CSS” option, but a child theme is the professional standard.
1.3. Essential Pre-Customization Checklist
- Backup Your Website: Always, without exception, perform a full WordPress backup before making any significant changes. Use a reliable WordPress backup plugin like UpdraftPlus or BlogVault. This is your safety net.
- Ensure a Staging Environment: The safest way to customize is on a staging site. This is a clone of your live website where you can test changes without affecting your visitors. Many top WordPress hosting providers offer one-click staging solutions.
Section 2: The Customization Toolkit: Your Arsenal of Methods
WordPress offers multiple pathways for customization, each with its own power and complexity level. We’ll start with the easiest and work our way up.
2.1. The WordPress Customizer: Live, Visual Control
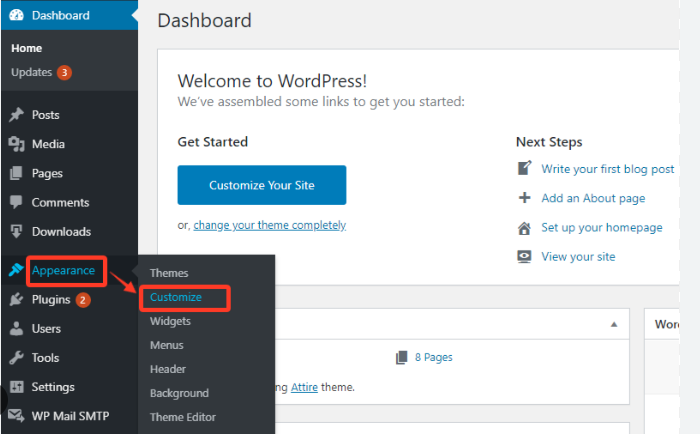
The WordPress Customizer is your best friend for real-time, visual tweaks. It’s the go-to tool for beginners and pros alike for many tasks. You can access it by going to Appearance > Customize from your dashboard.
Key areas you can control here include:
- Site Identity: Upload your logo, set your website branding with a site title and tagline, and control the site icon (favicon).
- Colors & Typography: Change the color scheme of your header, background, links, and buttons. Manage font customization for headings and body text, which is crucial for web design consistency.
- Menus & Widgets: Manage your navigation menu locations and customize sidebar widgets and footer areas through a drag-and-drop interface.
- Homepage Settings: Choose whether your homepage displays your latest blog posts or a static page a fundamental step for creating a custom homepage.
- Additional CSS: This is a powerful section where you can add your own CSS customization to override the theme’s default styles. It’s a great middle-ground between basic options and full theme development.
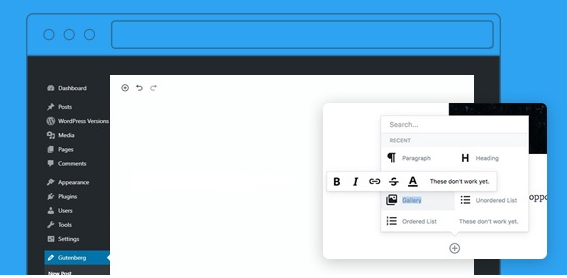
2.2. The Block Editor (Gutenberg): Content-Level Customization
Introduced as a core part of WordPress, the Block Editor (codenamed Gutenberg) has evolved into a powerful tool for designing page and post layouts.
- Full-Width Layouts, Containers, and Groups: Control the spacing, background, and width of sections on your pages without needing to touch code.
- Reusable Blocks: Create a custom call-to-action button or a testimonial section once and save it as a reusable block. This is a massive time-saver and ensures design consistency across your site.
- Block Patterns: Pre-designed sections (like headers, hero sections, feature lists) that you can insert with one click and then fill with your own content.
2.3. Page Builders: Maximum Drag-and-Drop Power
For those who want ultimate design freedom without coding, WordPress page builders are the answer. Plugins like Elementor, Divi Builder, Beaver Builder, and WP Bakery provide a front-end, visual editing experience.
- True “What You See Is What You Get” (WYSIWYG) Editing: You drag elements (text, images, buttons, videos) onto the page and style them in real-time.
- Theme-Agnostic Design: You can often create completely unique layouts that bear little resemblance to your base theme, perfect for landing pages and custom homepage design.
- Template Kits and Global Widgets: Many page builders allow you to create global headers, footers, and single-post templates, ensuring site-wide design consistency. For instance, the Freelancer WordPress Theme integrates smoothly with Elementor, giving freelancers complete control over their page layouts without writing a single line of code.
2.4. The Power of Plugins: Functionality and Style
The WordPress plugin directory is vast, and many plugins are designed specifically for customization.
- Header/Footer Builders: Plugins like “Header, Footer & Block Builder” or those included with page builders let you design these critical areas visually.
- Custom CSS Plugins: While the Customizer has this built in, plugins like “Simple Custom CSS and JS” allow you to manage site-wide CSS and JavaScript more organizedly.
- Menu Plugins: For creating advanced mega menus with columns and rich content, plugins are essential.
Section 3: Advanced Customization: Stepping into Code (Safely)
When visual tools reach their limit, a little code can go a long way. Always perform these tasks in a child theme or via a plugin designed for code snippets.
3.1. Mastering CSS Customization
Cascading Style Sheets (CSS) control the visual presentation of your website. Learning even basic CSS is the most valuable skill for WordPress design customization.
- How to Target Elements: Use your browser’s “Inspect” tool (right-click on an element and select “Inspect”). This reveals the HTML structure and the CSS classes/IDs you need to target.
- Common CSS Tweaks:
- Change font colors: color: #ff0000;
- Modify fonts: font-family: ‘Arial’, sans-serif;
- Adjust spacing: margin: 20px; padding: 10px;
- Hide elements: display: none;
- Where to Add CSS: The safest place is the “Additional CSS” section in the WordPress Customizer, as it persists through theme updates.
3.2. Introduction to PHP and Template Files
For more structural changes, you may need to edit PHP template files. This is where the child theme is non-negotiable.
- Common Template Files:
- header.php: Controls the header area.
- footer.php: Controls the footer area.
- functions.php: Used to add new features and functionality.
- page.php / single.php: Controls the layout of pages and blog posts, respectively.
- Example: Adding a Custom Hook or Function. You can use your child theme’s functions.php file to enqueue custom stylesheets or add new widget areas to your theme.
Section 4: Key Areas to Customize for Maximum Impact
Let’s apply these methods to the most critical parts of your site.
4.1. Crafting a Memorable Header and Navigation
Your header is your digital storefront. Use the WordPress Customizer or a page builder to:
- Upload a sharp, high-resolution logo.
- Create a clear, intuitive navigation menu.
- Implement a sticky header to keep menu access always available.
- Add a search bar, contact phone number, or call-to-action button.
4.2. Designing a Conversion-Focused Homepage
Your homepage is often the first impression. Don’t just use a list of blog posts.
- Use a page builder to create a “static homepage” with a compelling hero section, feature blocks, testimonials, and a clear value proposition.
- Ensure it is optimized for mobile responsiveness and fast website loading speed.
4.3. Perfecting the Blog Layout and Single Post Template
The reading experience is paramount for SEO and user engagement.
- Customize the post meta (author, date, category) display.
- Control the sidebar placement or create a full-width, distraction-free layout.
- Add a custom author bio box and related posts section at the end of each article.
4.4. Styling Buttons, Forms, and Interactive Elements
Consistent, well-designed interactive elements are key to website branding.
- Use global styling in your page builder or CSS customization to ensure all buttons have the same color, rounded corners, and hover effects.
- Style your contact forms to match your brand’s color scheme.
Not ready to invest yet? Check out our list of Top Free WordPress Themes in 2025 You Need to Try to find flexible, beginner-friendly options.
Section 5: Performance and SEO: The Non-Negotiable Final Step
A beautiful website is useless if it’s slow or invisible on Google.
- Optimize for Speed: Every customization has a cost. Use image optimization plugins, caching solutions, and a Content Delivery Network (CDN) to maintain blazing-fast website loading speed.
- Ensure Mobile Responsiveness: Test your customizations rigorously on phones and tablets. A mobile-responsive design is critical for user experience and Google rankings .
- Maintain SEO Best Practices: Use an SEO plugin like Rank Math or Yoast SEO. Ensure your customizations don’t remove critical SEO elements like structured data, clean heading hierarchies, and meta tags. If you’re managing multiple sites or want access to a range of optimized designs, the WordPress Theme Bundle offers fast-loading, SEO-friendly templates ideal for scaling your projects.
Conclusion: Your Journey to a Unique Website Starts Now
Customizing your WordPress template is a journey of empowerment. You’ve moved from being a passive user of software to an active architect of your digital space. We’ve covered the entire spectrum from the safety of the WordPress Customizer to the raw power of CSS customization and child themes.
Remember the core principles: always back up your WordPress site, use a staging environment for major changes, and build upon a solid foundation with a child theme. Start with small changes, build your confidence, and gradually tackle more complex customizations.Your website is a living entity. As your brand evolves, so should your site. Embrace the process of continuous improvement, and don’t be afraid to experiment (safely!). You now have the knowledge and the toolkit to build a website that not only looks exactly how you envision it but also performs brilliantly for your audience and your business. For those seeking even greater customization, support, and advanced features, premium WordPress themes from trusted developers like Themes Carts offer excellent value and scalability.
